Best Tips To Clean Your E Cigarette That You Need To Know
Vape Cleaning Tips
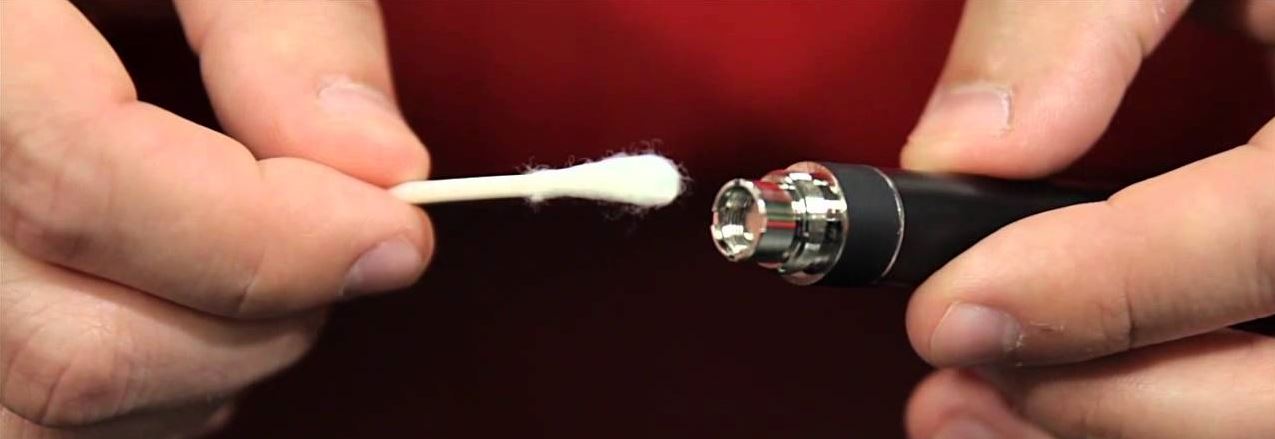
1. Keep The Battery Connection Pristine

The first and most essential step for keeping up your vape is ensuring that the port where the battery connects to your vape is continually shimmering clean. It is relatively normal for eliquid to seep into the space where you screw the battery in, and you should check it day by day for any stickiness or development. Tidy and grime can likewise get trapped in it when you disassemble and handle the device, so make sure you wash your hands and dependably use a clean, hard surface to take your vape separated on. In the event that your vape has a grimy battery port, cleaning out the tidy and gunk is simple; simply wipe it out with a clean fabric or cotton swab. Clean the threads carefully by running the cotton swab around the sides of the port to get any gunk out of the grooves. Simply make sure you use a solid material that won't tear or leave cotton fibers behind. You would prefer not to obstruct everything over once more!
2. Cleaning Out The Inside Of Your Vape
"There's nothing better than having an astounding vaporizer that dependably gives you rich flavor and consistent vapor."
This is where the type of vapor device you use matters. Disposable e-cigarettes are designed to just be discarded after a brief period of time and accordingly don't more often than not require any cleaning. However, in the event that you have any sort of reusable or refillable vaporizer you should clean your vape's tank and atomizer regularly.The initial step is to disassemble your device; it's never safe to clean your vape with the battery still attached, and you'll need to open up your Vape Pen to get to the inside. In the event that you need help dismantling it, check the manual that came with your vape or ecigarette for a chart or guide. Once it's disassembled, check the loops on your vape for any developed residue; they will look dark and gunky on the off chance that they need to be cleaned. Likewise check the inside of your tank, especially the ends and around the atomizer head, for any development.
3. Cleaning Your Clearomizer And Atomizer
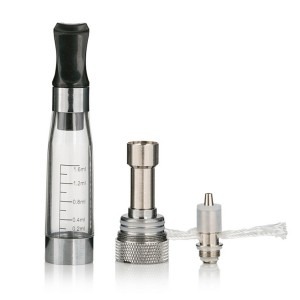
In the event that your vape has a clearomizer tank, you will need to clean out the tank every three or four weeks, or whenever you switch eliquid flavors. Eliquid residue can develop inside the tank and the atomizer head, so you should flush them out and wipe the tank clean to keep it in great condition.Initially, detach the atomizer from the tank and take separated as a significant part of the tank as your vaporizer's design permits. Absorb the atomizer warm water for several minutes. Meanwhile, spill any excess eliquid out of the tank and rinse it out altogether with warm, lathery water. You can use a paper towel or clean fabric to wipe out the inside to remove any leftover residue. Then take your atomizer and give it a careful rinse with warm, running water. Force the wicks far from the loop and make sure to rinse both the wicks and curl completely. When the water runs clear, your wicks look white, and your curls are clear of gunk, set your atomizer and tank on a clean towel to dry.
4. Cleaning Your Cartomizer

On the off chance that you have a reusable cartomizer, dismantle the device and remove the rubber tops on both ends of the cartomizer. Then, heat up a pot of water and place all the cartomizer pieces in the bubbling water. After around ten minutes, carefully remove the cartomizer and let it cool. Then rinse the cartomizer with warm, running water from the faucet, and give it a decent investigate. On the off chance that it's as yet grimy or has a foul smell, then repeat the process until it's clean. When the curls and polyfill in your cartomizer look clear of gunk and doesn't stink anymore, then your cleaning work is done and it's time to let it dry.
5. Drying Your Vape Post-Cleaning

Cleaning out your vape pretty much dependably requires flushing it out with water, and you will need to make sure it is completely dry before utilizing it once more. Any dampness left in your tank, wicks, or atomizer will dilute your eliquid and demolish the vapor. The safest approach to dry it out completely is to set it on a dry towel and leave it to air dry for 12-24 hours before utilizing it. Some people suggest utilizing a hairdryer or putting the atomizer in the oven on low heat to dry it more rapidly, yet those methods hazard harming or melting the sensitive parts of your vaporizer. On the off chance that you need them to dry more rapidly, have a go at setting up a fan to blow air over the disassembled parts of your vape instead.
6. Treat Your Vape Right

There's nothing better than having a top notch vaporizer that dependably gives you rich flavor and consistent vapor. Regular, proper cleaning is a necessary yet often overlooked assignment to make that happen, and it can go far towards extending the life of your vape, too. In the event that you need help envisioning how to clean your vape or have a bizarre model, there are hundreds of online video tutorials to help you learn. It's dependably a smart thought to take a gander at your E-cigarette's user manual for tips and directions for how to best clean and keep up your specific vaporizer.
Inspecting your vape for development and keeping it clear of residue is most likely the best approach to ensure you get consistent vapor quality, so bear in mind to disassemble and check your vape regularly.


Comments
Post a Comment